
Overview - What to Expect
This tutorial will take you through the steps of installing the Custom Product Options (CPO) code onto your theme. The installation time is approx. (10-15 min) for completion. If you come across any issues during the course of the installation please feel free to submit a ticket by clicking here.
(Please note that the dashboard has changed. I will include the snippets below in the same order as they appear on the dashboard in the video.)
Dashboard Snippets - As they appear in the video
Snippet #1:
{% comment %}Custom Product Options by W3{% endcomment %}
<div class="w3-product-options" data-product-id="{{product.id}}" data-tags="{{ product.tags | join: ", " }}"></div>
Snippet #2:
{% if step == 'item_row_class' %}
  {% if item.properties._options_group_id %}options-group group-id-{{ item.properties._options_group_id }}{% endif %}
  {% if item.properties._options_hidden %} options-hidden{% endif %}
  {% if item.properties._options_unlink %} options-unlink{% endif %}
{% endif %}
{% if step == 'money_line' %}
  {% if item.properties._options_group_id and item.properties._options_hidden == nil %}
    {% assign guid = item.properties["_options_group_id"] %}
    {% for item2 in cart.items %}
      {% if item2.properties._options_hidden and item2.properties["_options_group_id"] == guid %}
        <div class="options-additional-item"> + {{ item2.line_price | money }} </div>
      {% endif %}
    {% endfor %}
  {% endif %}
{% endif %}
Snippet #3:
{% render 'w3-product-options', item: item, step:'item_row_class' %}
Snippet #4:
{% render 'w3-product-options', item: item, step:'money_line' %}
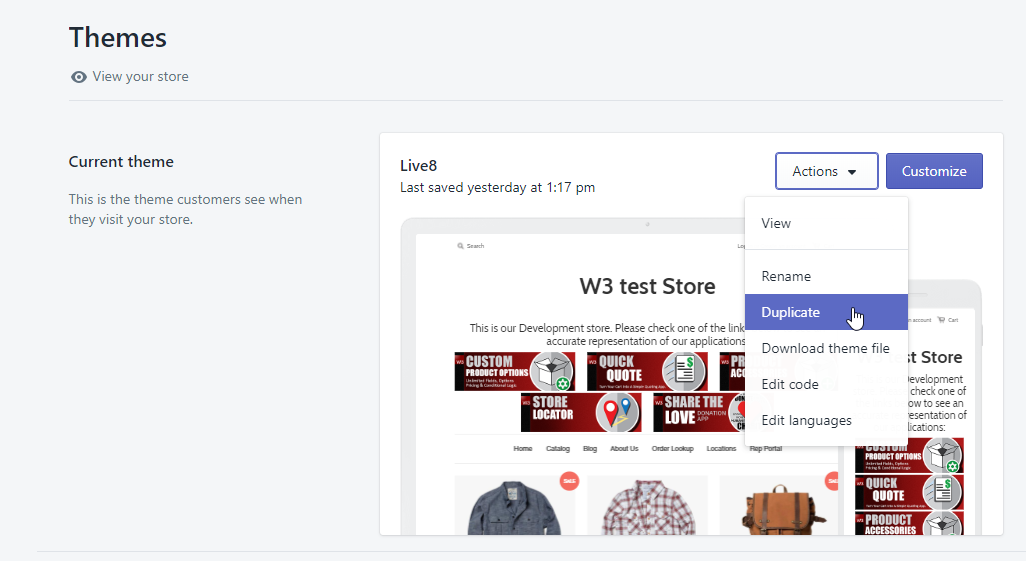
Step 1 - Duplicate Theme
It is always best practice to duplicate your theme before any installation of new code to insure you have a fallback if any issues arise you can always revert to a clean copy of the theme.
- Go to Online Store > Themes
- Click Actions > Duplicate
- Rename duplicated theme and add "- before CPO" so you can remember the save state.
Step 2 - Add the form to the Product Page
We will need to add the snippet that creates the form on the product page. Navigate to your product.liquid file and open in the previewer.
Search for "submit"
(If your products page does not contain the "submit" your add-to-cart button is located in a nested file and will need to be located. See image below of an example.)

(This code contains a comment that states the location of the nested file being in the file product-template.liquid. Navigate to this file and search again for submit.)
This submit should be your add-to-cart button.
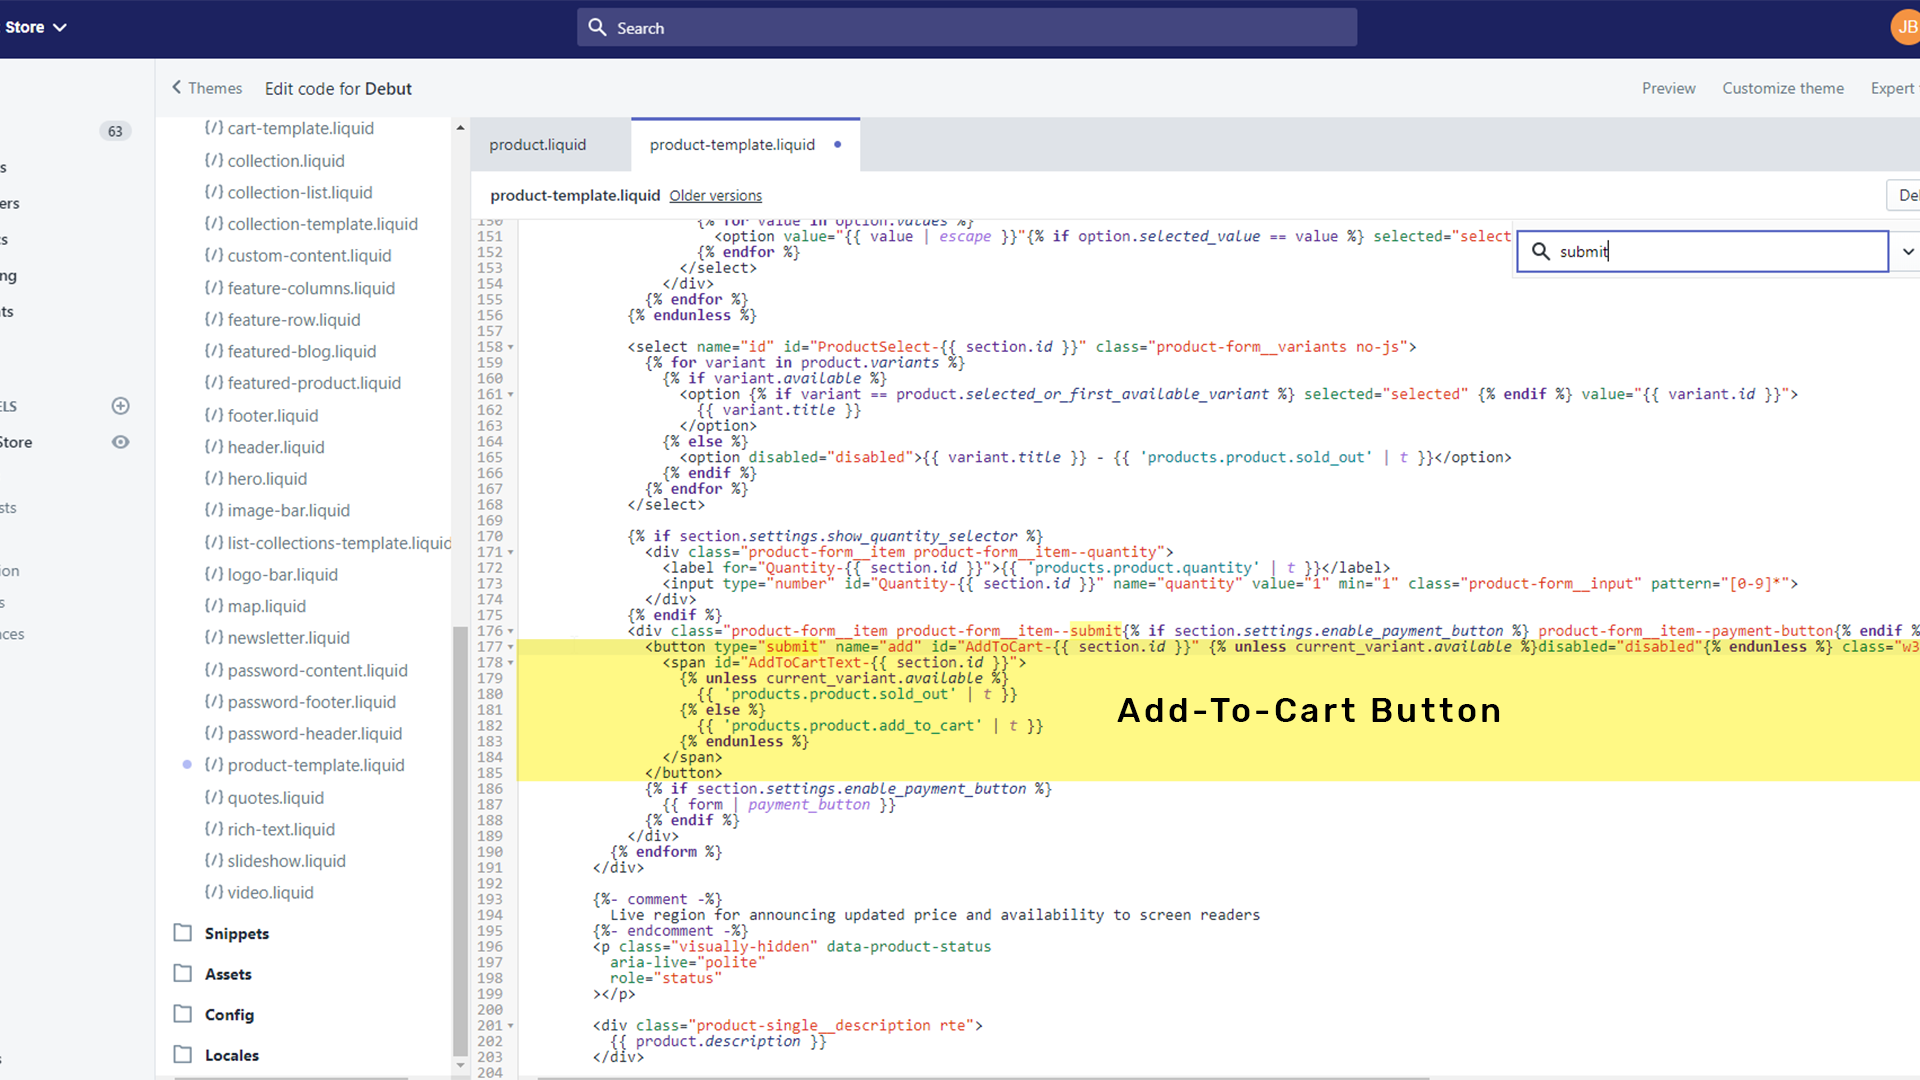
Traverse the code above the add-to-cart button to Quantity selector code segments.
Copy Snippet below.
{% comment %}Custom Product Options by W3{% endcomment %}
<div class="w3-product-options" data-product-id="{{product.id}}" data-tags="{{ product.tags | join: ", " }}"></div>
Paste the snippet above the quantity selector.
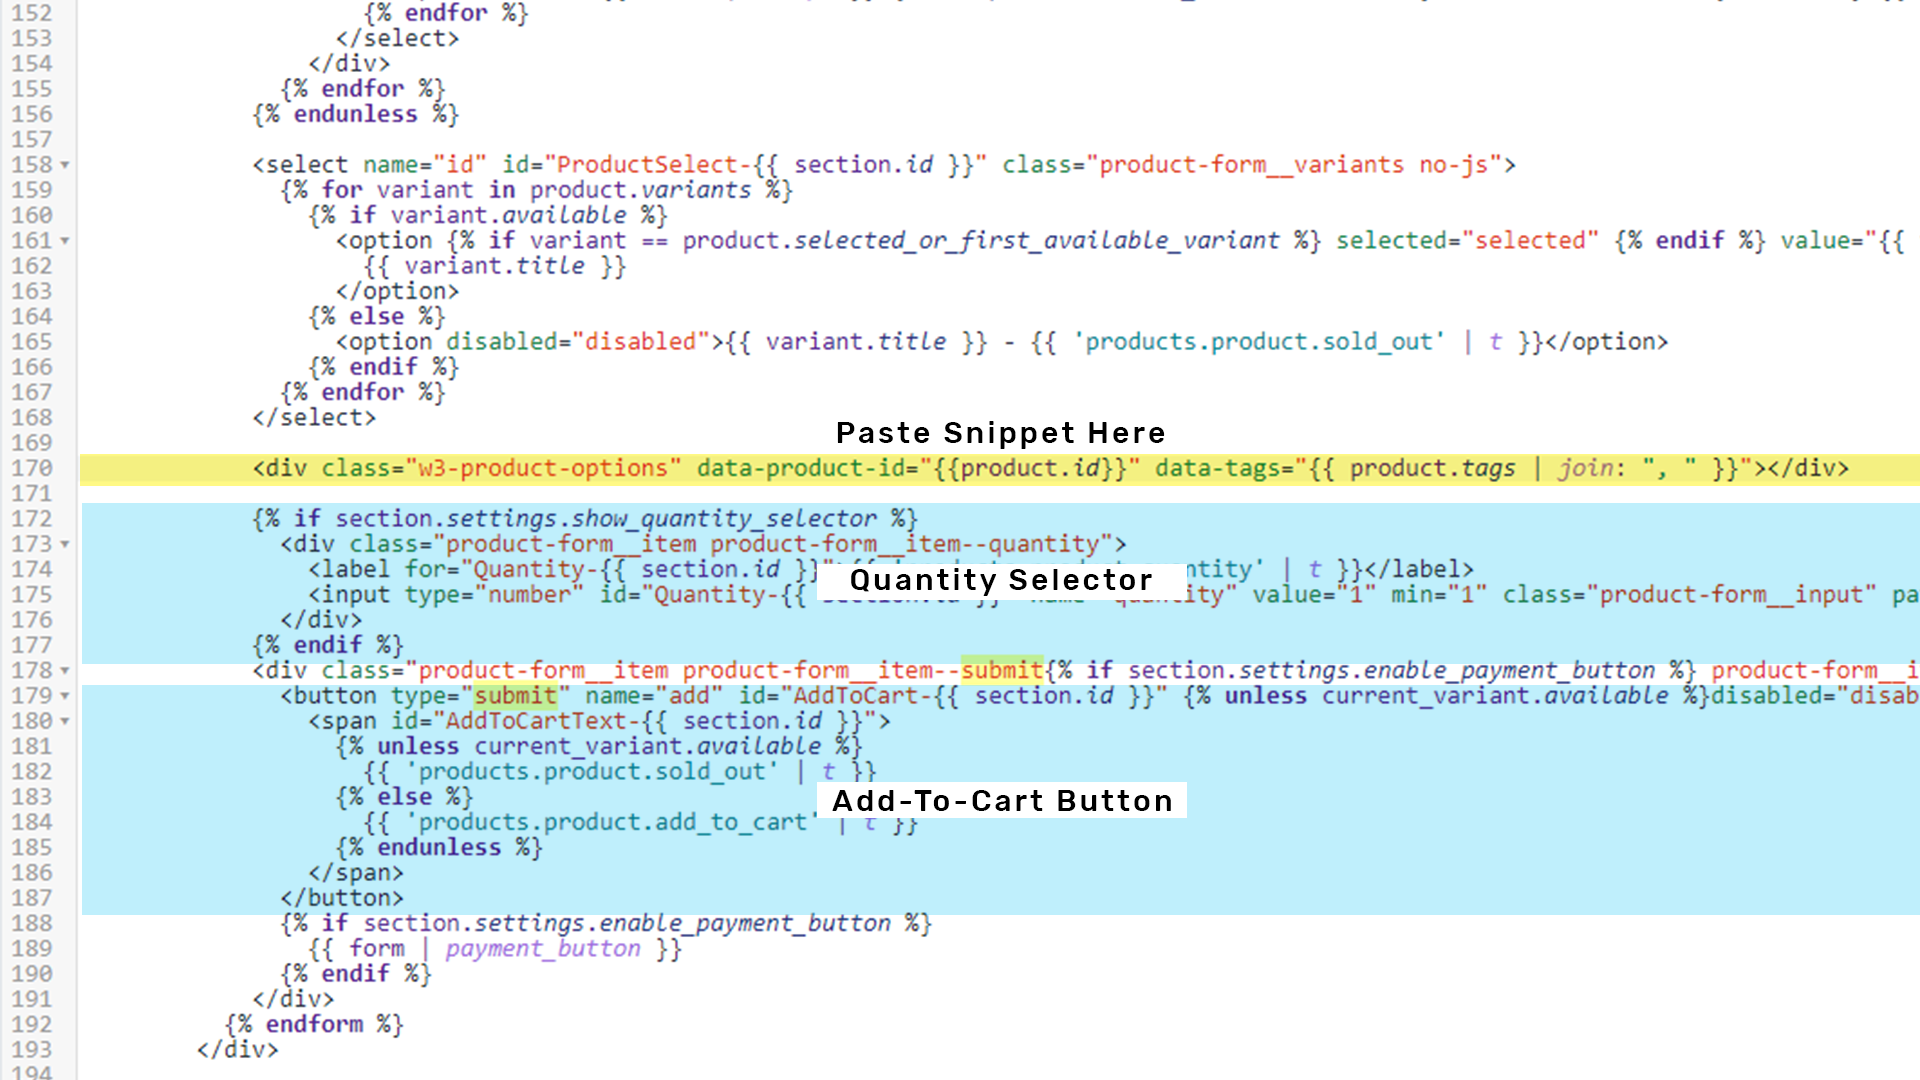
Be sure that the snippet is placed inside the <form> or {% form %} tags
Save the file to commit changes.
Step 3 - Create Snippet in the Snippet Folder
We will need to create a new snippet file in your theme files. In the menu on the left locate the snippet folder. At the top of the folder click the add new snippet link.
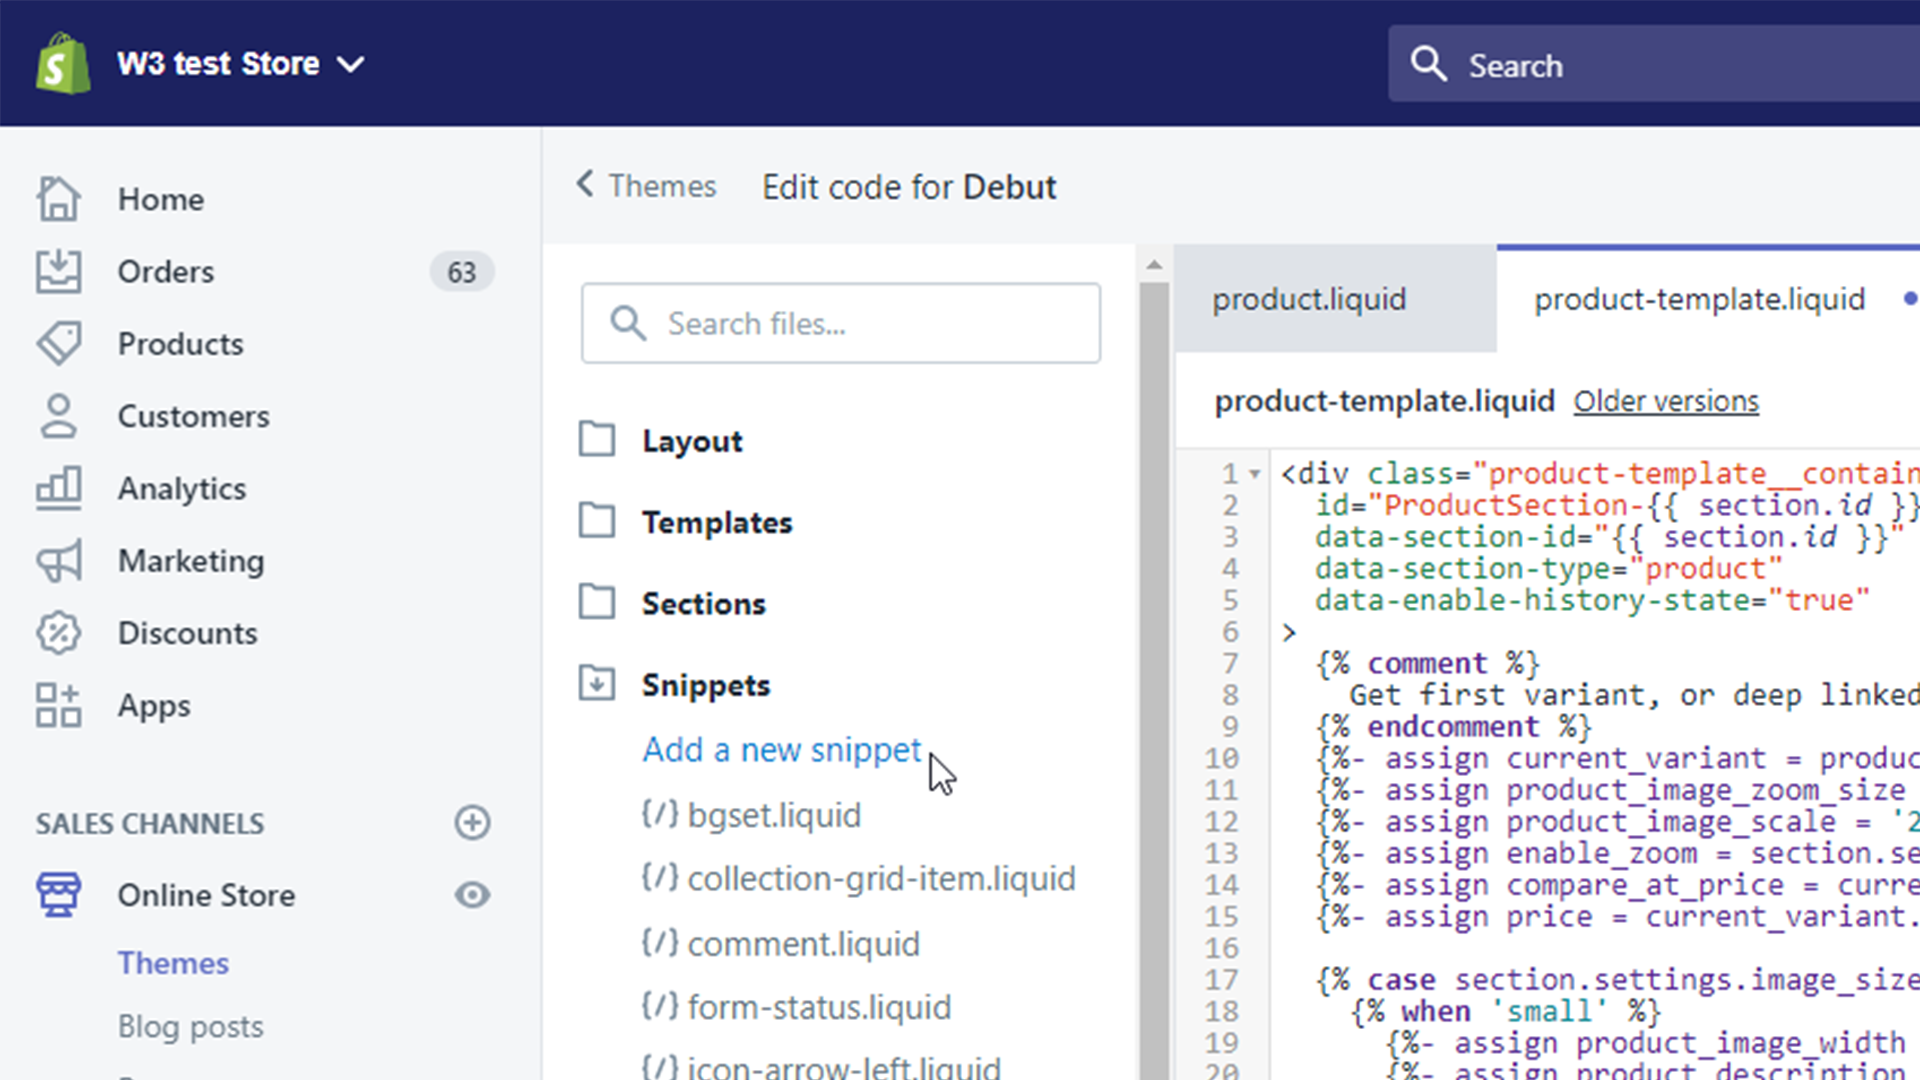
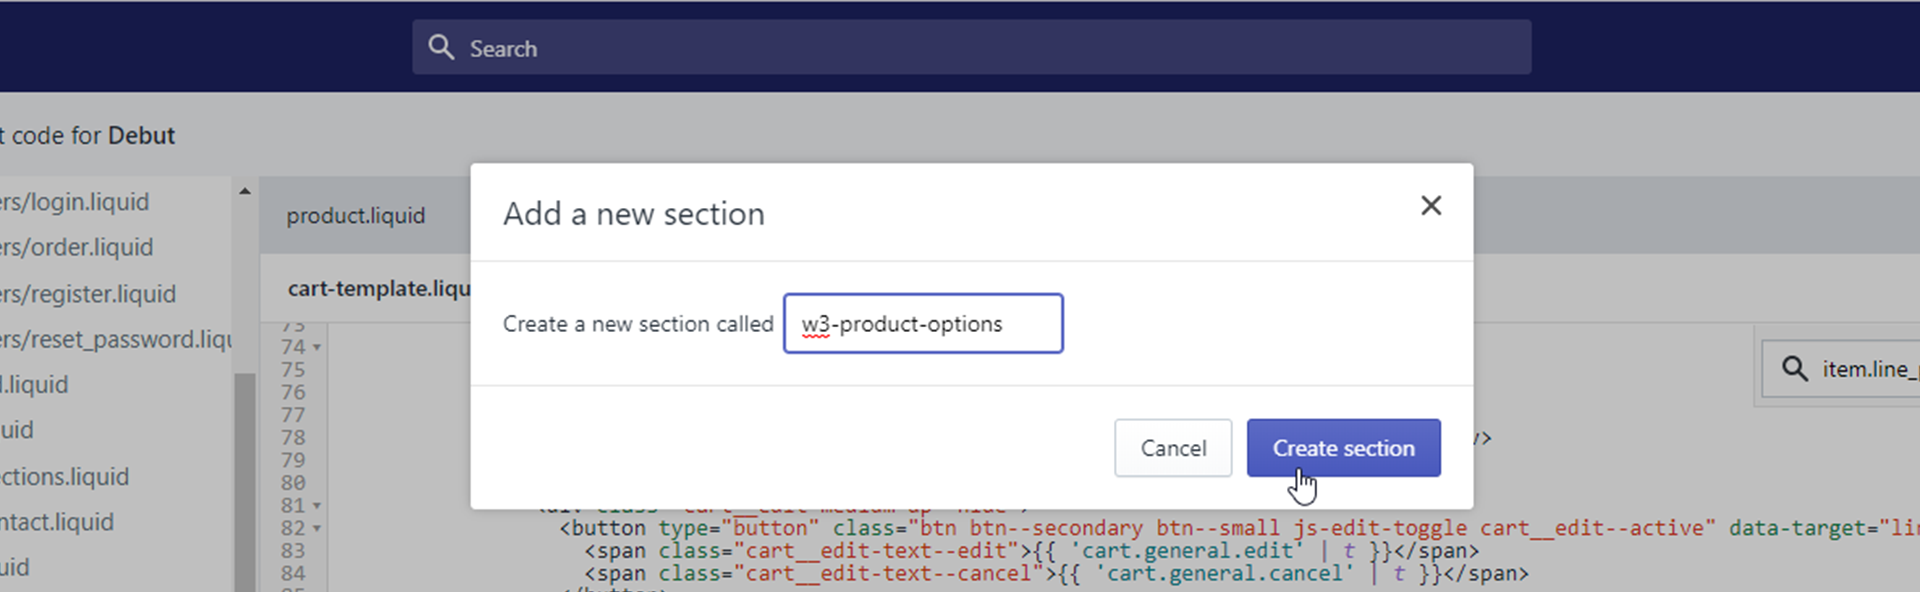
Name this snippet: w3-product-options
Click Create Snippet to save the snippet
Copy the snippet code below
{% if step == 'item_row_class' %}
  {% if item.properties._options_group_id %}options-group group-id-{{ item.properties._options_group_id }}{% endif %}
  {% if item.properties._options_hidden %} options-hidden{% endif %}
  {% if item.properties._options_unlink %} options-unlink{% endif %}
{% endif %}

{% if step == 'money_line' %}
    {% if item.properties._options_group_id and item.properties._options_hidden == nil %}
        {% assign guid = item.properties["_options_group_id"] %}
        {% for item2 in cart.items %}
            {% if item2.properties._options_hidden and item2.properties["_options_group_id"] == guid %}
              <div class="options-additional-item">
                + {{ item2.line_price | money }}
              </div>
            {% endif %}
        {% endfor %}
    {% endif %}
{% endif %}
Inside the new snippet file paste the code.
Click Save to commit changes to the file.
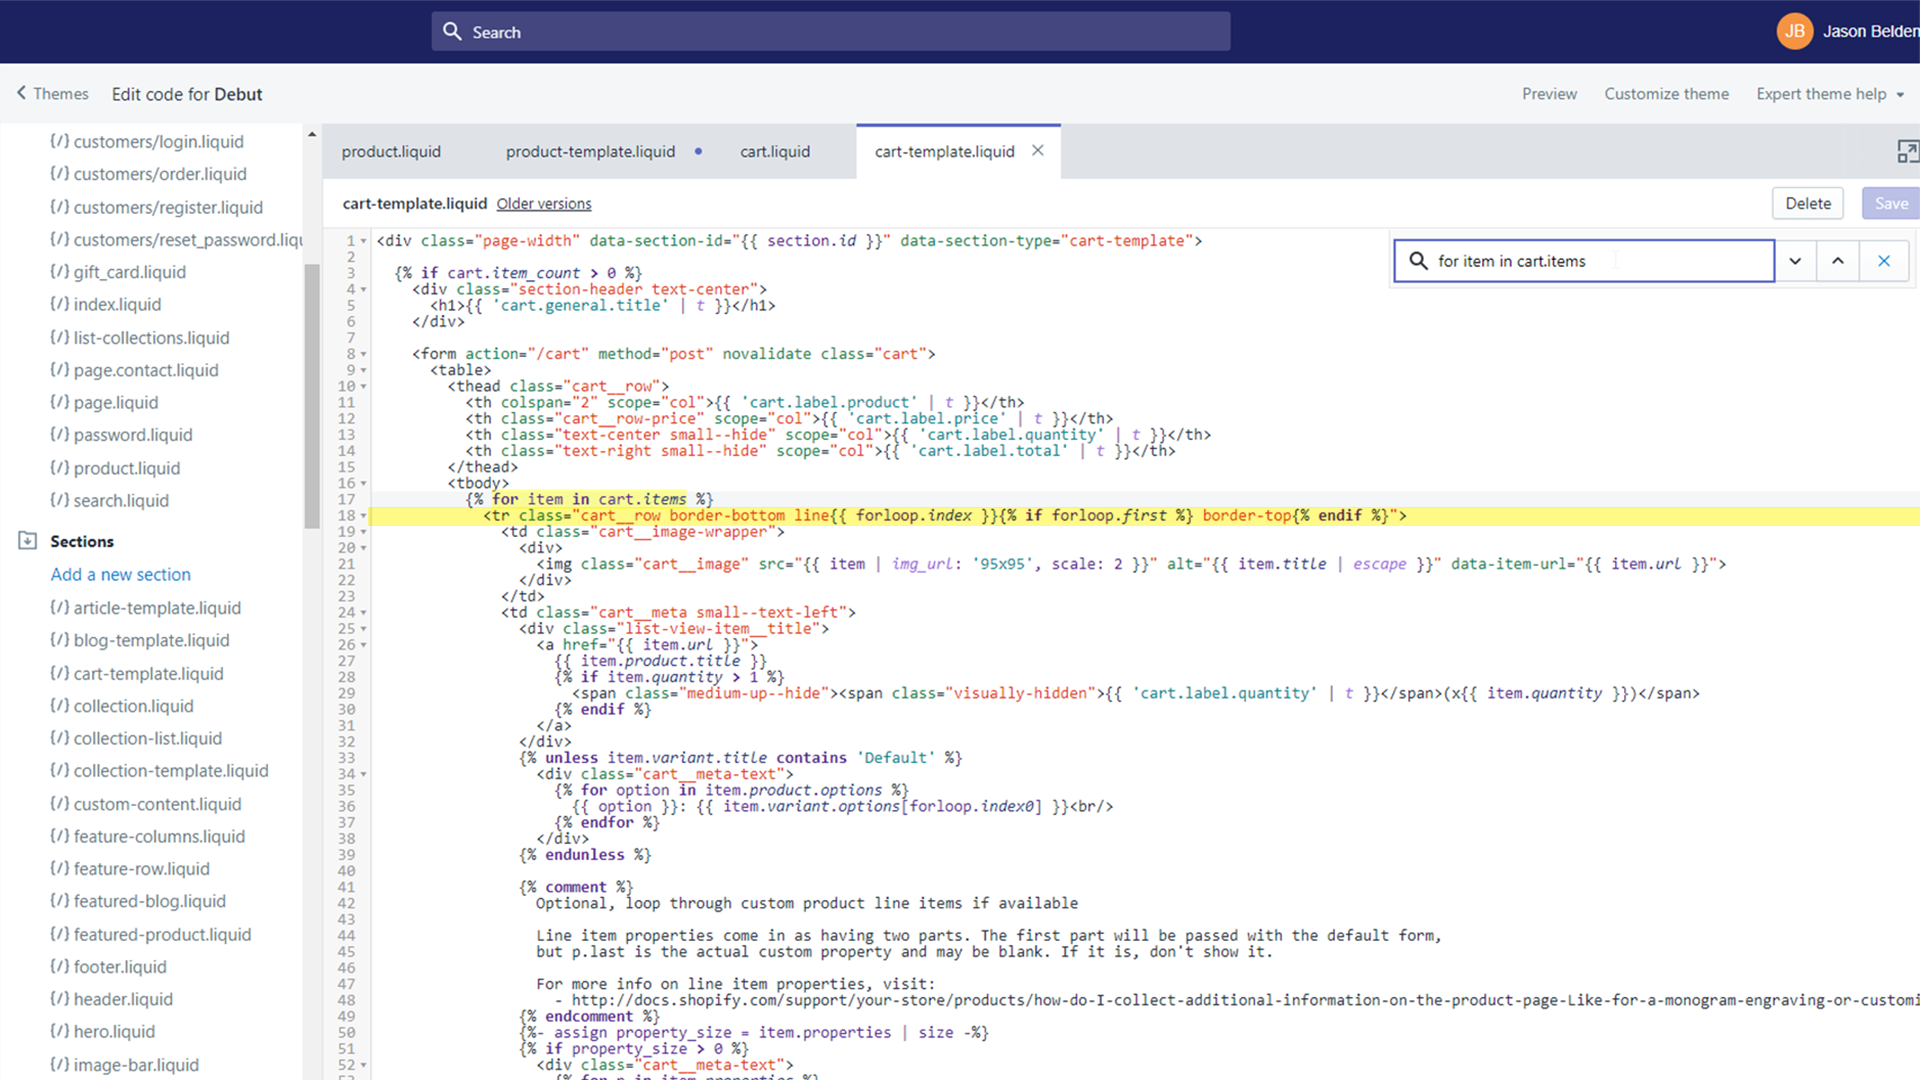
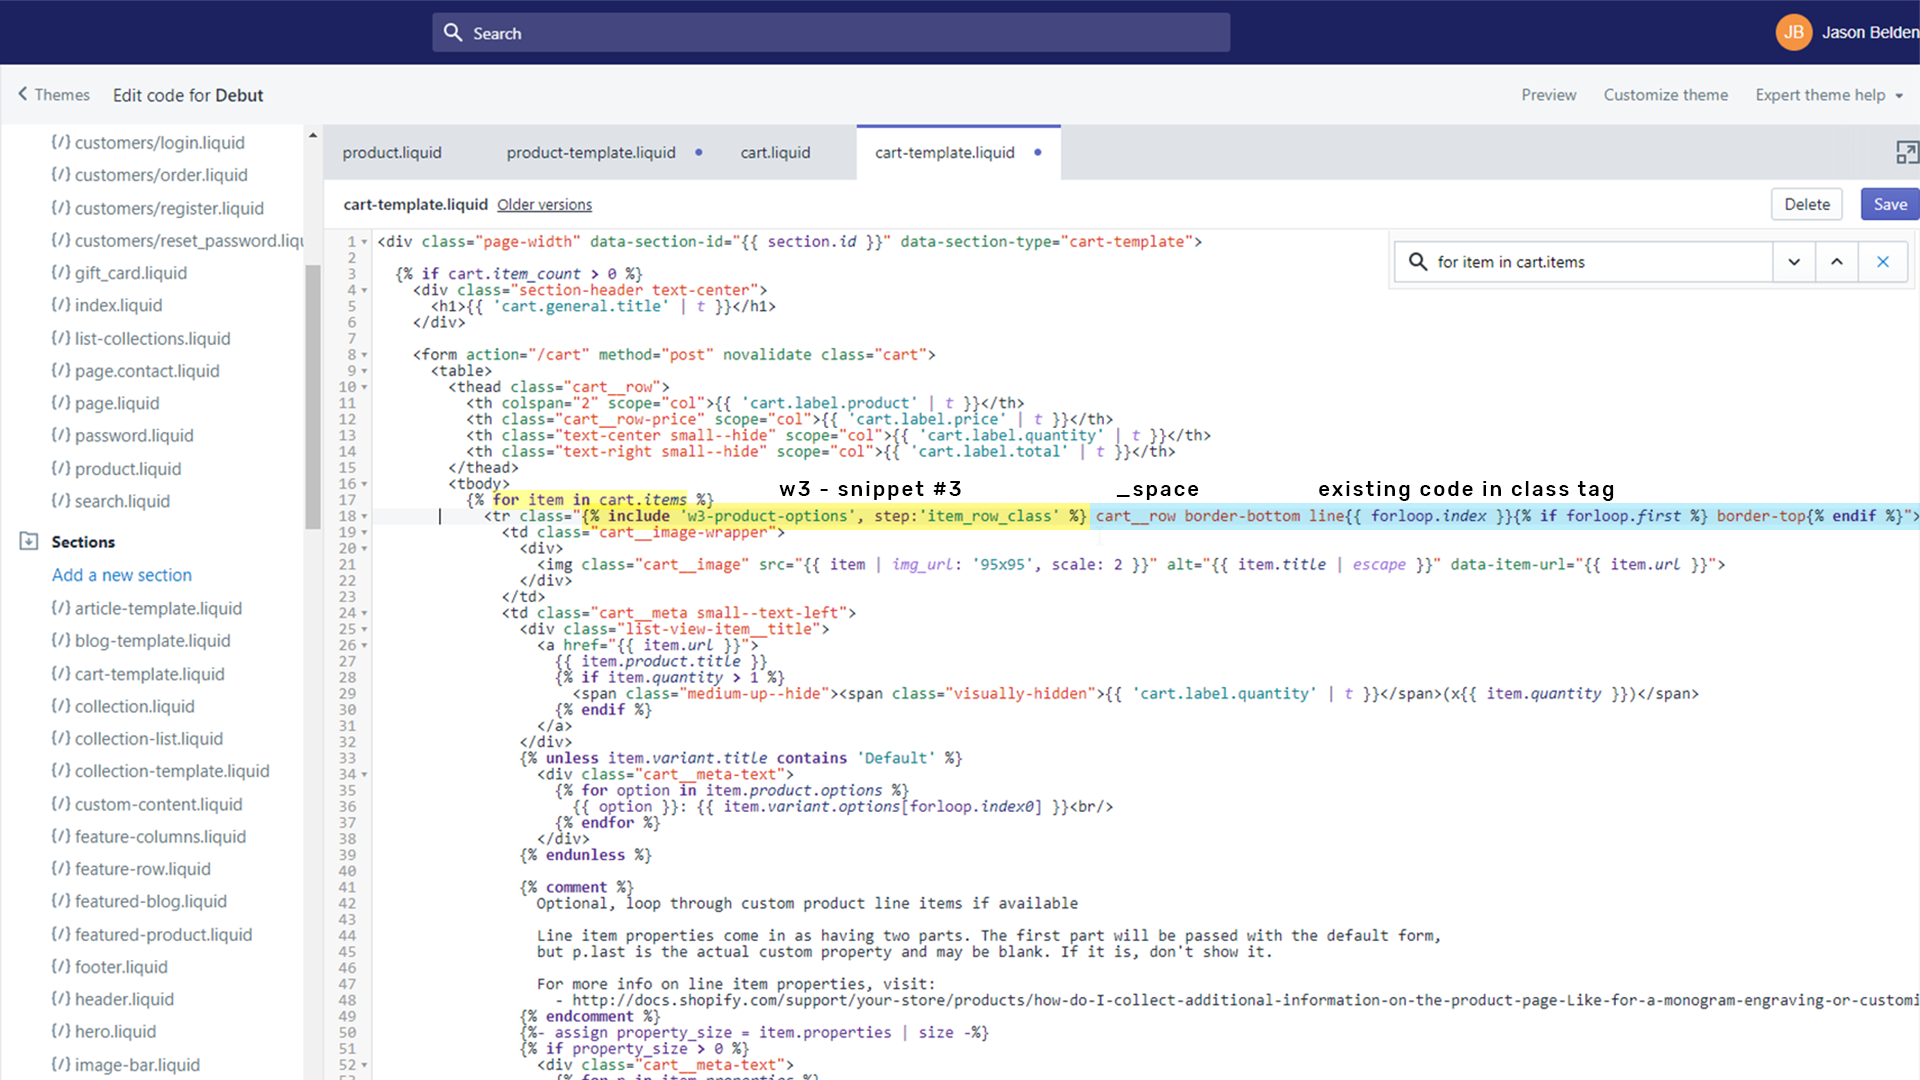
Step 4 - Add Class to the Item Row
This section of code will allow the app to display the inline properties on the cart page.
Search for "for item in cart.items"
On the line immediately after this should be a <div>, or <tr> tag
Simply add a class="" to the tag and then paste the snippet inside of the "" of the class.
If there the class already exists, be sure to add a space between the snippet and the existing code.
{% render 'w3-product-options', item: item, step:'item_row_class' %}
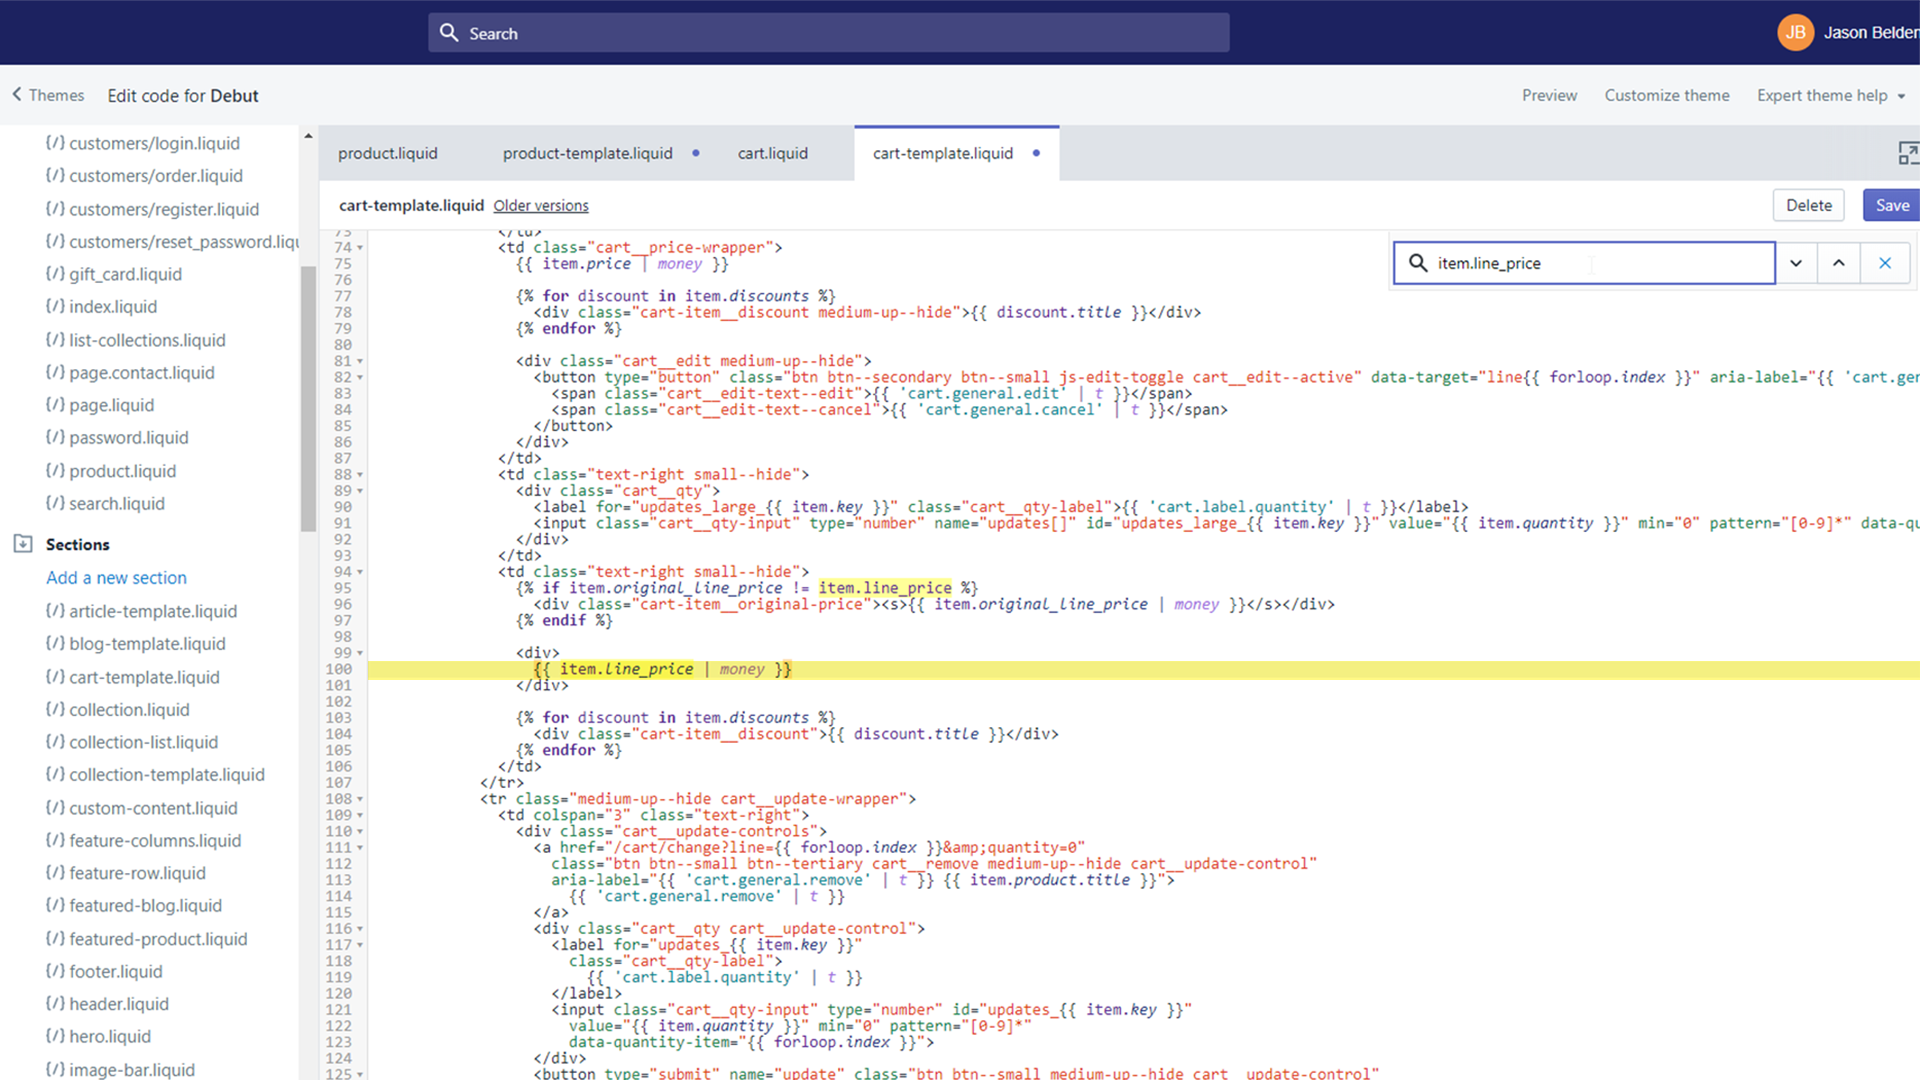
Step 5 - Get Money to Display
This next step will allow the app to display the price on the cart page.
Search for "item.line_price"
Look for a line similar to the snippet below.
{{ item.line_price | money }}
(If your cart template does not contain the if search for "product.title" instead)
Go to the end of the tag and after the } and press the return key to add a new line.
Copy the snippet below.
{% render 'w3-product-options', item: item, step:'money_line' %}
Paste the snippet on this new line.
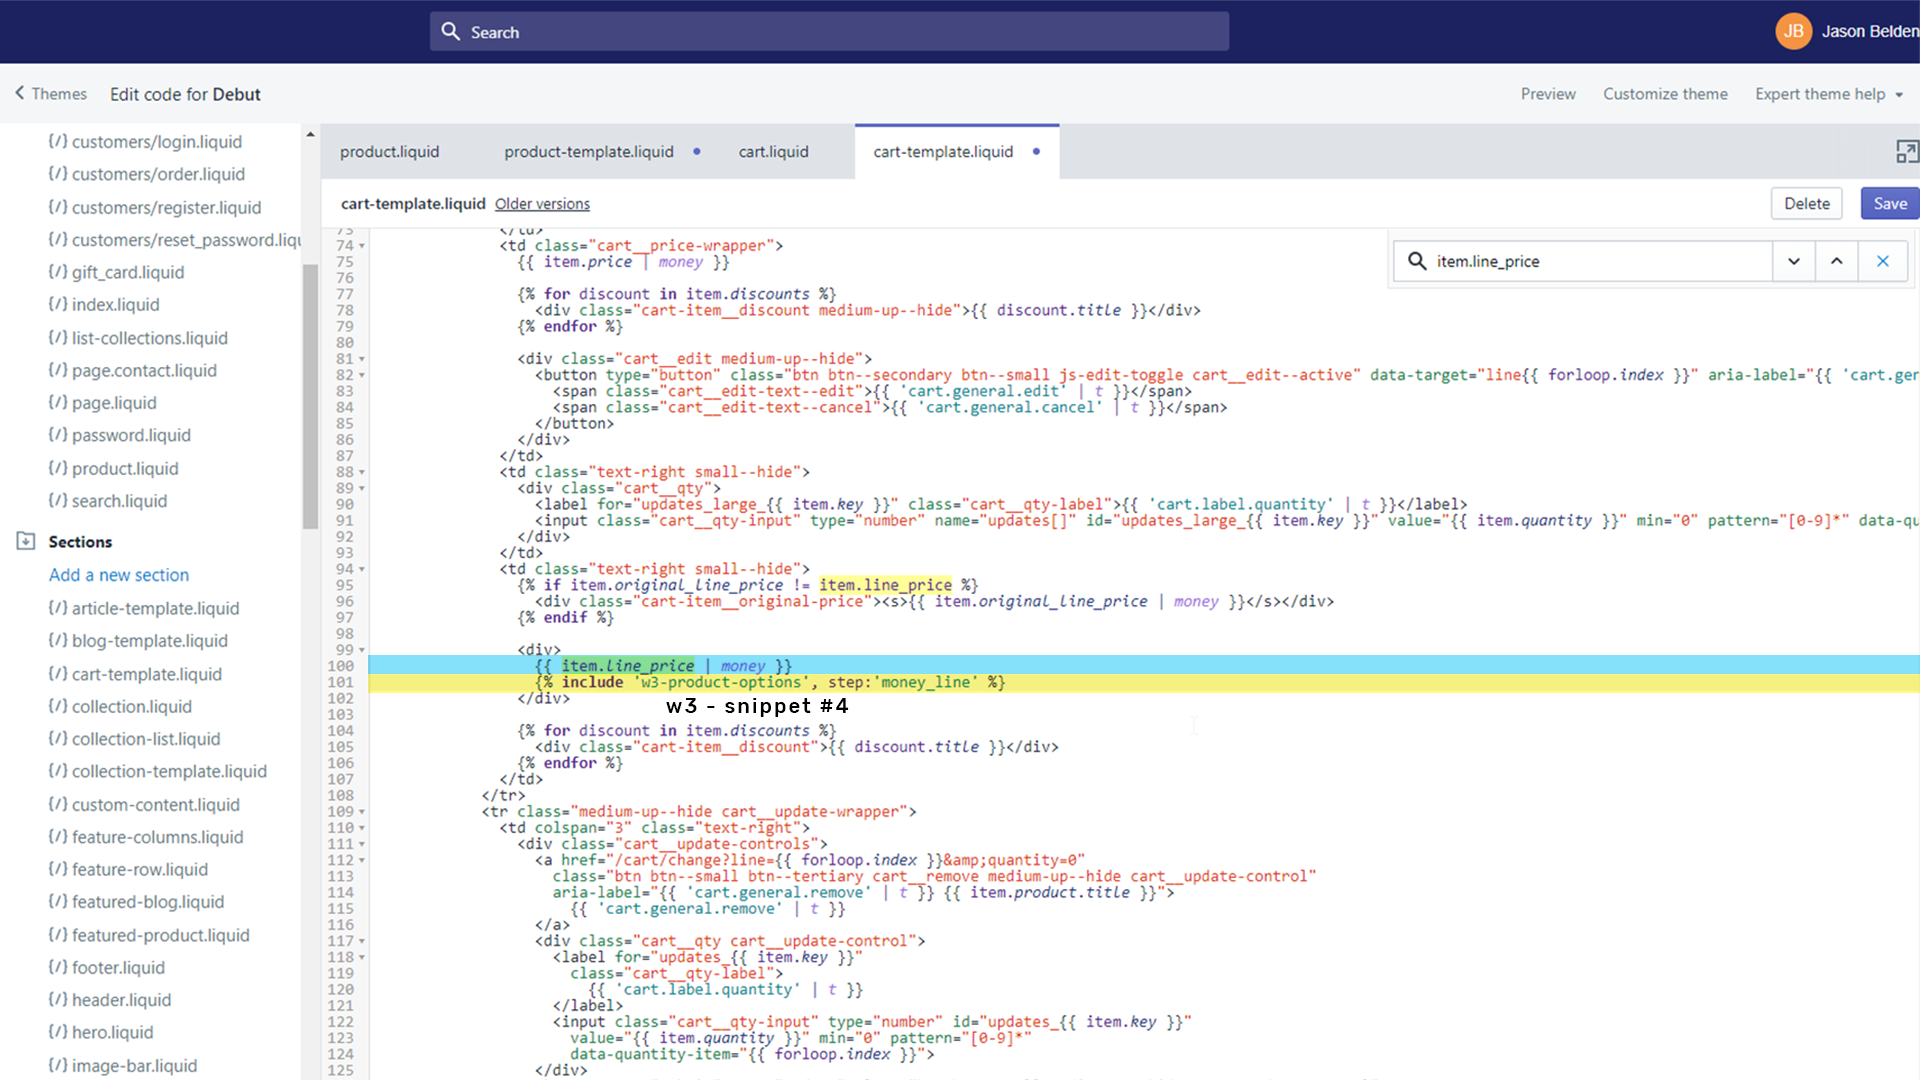
Save the file
This completes the installation. If you have any questions, feel free to reach out by clicking here.